Showing posts with label How to. Show all posts

Friday, September 30, 2016

Voltaic - Crocheted Fingerless Gloves - Introduction & Slst Tutorial


Voltaic is a pair of  crocheted fingerless gloves designed to be worked each in one piece and use a single skein (100g) of Malabrigo Arroyo (though the larger sizes will need more than a skein).

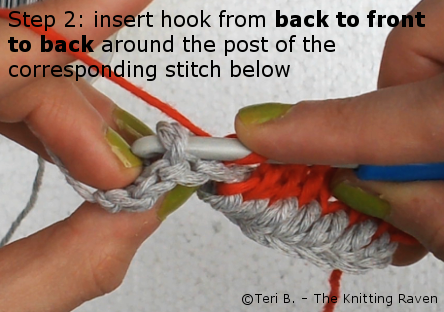
They're made using mainly a mix of FPtr, BPtr, FPhdc and BPhdc.

Below you'll find a quick video I put together. It includes a tutorial on the technique used to work each glove in one piece without having to cut the yarn.

Of course, it's not mandatory you use this technique. If you'd rather cut the yarn, go ahead. I know I don't like cutting and rejoining my yarn, especially when making this kind of project. I've had some nasty surprises in the past where the thumbs of some of my gloves have started to unravel because... well, I don't know. I probably just suck at tying knots :/

Anyway... here are some extra details on the naming of the pattern, if you're curious:

These fingerless gloves are called Voltaic because they remind me of a Voltaic pile I once saw, a while ago, in science class. Whilst I may not remember the whole story behind the device (other than the fact it was the first battery, so to speak), this is the first thing that came to my mind once these gloves had taken form. To me, they look like a stack (or, you know, a pile) of wooly disks - just like the voltaic pile is, basically, a stack of metal disks (Yay! Science!).


Additionally, the colorway of the yarn I used does strangely remind me of clockworks, machines, strange devices and all that jazz. It’s called Arco Iris (literally ‘rainbow’) and to me it looks like the color of an oil/gas puddle when the sun hits it. Maybe it’s farfetched, but this is exactly how my mind made the connection.

Anybody else see the resemblance? No? Just me?
Of course, you don't have to use Arco Iris. This pattern will work with both solid and variegated colorways. A solid color, especially a light one, will showcase the texture nicely, A variegated colorway (especially hand-dyed/with short color repeats) will yield a pretty interesting result, as the stitches used will further mix the colors together. You can also experiment with stripes, especially if you make a size of gloves that calls for more than one skein of yarn.

Here's the first Voltaic prototype (shorter upper hand& different thumb). You can see the texture shows up quite nicely in a solid, lighter color.

If you need help with some of the stitches used (or simply want to see what you'll be in for if you decide to splurge a few bucks on the pattern ;p), you can find the available photo tutorials here.

***

In case you've stumbled upon this article by accident and are interested in purchasing this pattern, you'll find it here.


FPtr - Photo Tutorial

Here's how to work a FPtr (= Front Post treble crochet).
This stitch is used in my Voltaic fingerless gloves pattern.


FPhdc - Photo Tutorial


Here's how to work a FPhdc (= Front Post half double crochet).
This stitch is used in my Voltaic fingerless gloves pattern.


BPhdc - Photo Tutorial

Here's how to work a BPhdc (= Back Post half double crochet crochet).
This stitch is used in my Voltaic fingerless gloves pattern.

To help you understand, here's a gif of the motion you'll have to make:


BPtr - Photo tutorial

Here's how to work a BPtr (= Back Post treble crochet).
This stitch is used in my Voltaic fingerless gloves pattern.
To help you here's a gif showing you the motion you'll be doing:

Sunday, June 7, 2015

Kingsroad - Custom Macramé & Braids Fringe

So, you've crochetted your Kingsroad and want the fringes of your stole/scarf to look like this:


Then read on and (re)discover the joy of knotting :p

Ideally, to work the macramé and braids fringe you should have a number of strands that's a multiple of 12 (since you need a mulitiple of both 4 (for the macramé) and 3 (for the braids)).
Of course, counting strands can be tedious, especially across a wide stole on which you have already spent many hours of your time. A stole that you're eager to wear. A stole that you may or may not have had enough of (hello, supersized stole lovers ;p). I know I couldn't be bothered to count strands at that point. Call me lazy - I am. So I took the easy route.
I didn't count. And when I ended up with 5 strands for the last square knot, I worked the excess strand together with another. Same goes for the last braid. As long as your yarn is not too thick, this won't be noticeable.

Here's how to work a basic square knot in macramé:


To make a square knot, you need 4 strands of yarn (those are called cords in actual macramé projects).
B and C are your core cords: they will not 'move' as you make this knot.

Step 1: Pass A over B and C and under D.

Step 2: Bring D under C and B and over A through the loop that A forms with B.

Step 3: Pass A over C and B and under D.

Step 4: Bring D under B and C and over A through the loop that A forms with C.


Lastly pull on cords A and D to tighten the knot.


Now, the actual fringe 'how-to':

Work square knots across the whole fringe (that's row 1).
Then work alternating square knots for Row 2 & 3


On Row 2, D and A become your core cords. Your working cords are now C and B.
Work Row 3 the same way you did row 1.

After these three rows of macramé, braid the strands together.

Once you're done knotting and braiding, you'll probably want to block the macramé section to open up the net-like fabric.


You should end up with something like this (note that I wore this stole all winter, meaning that more than six months have passed between the above and the below picture - the macramé still looks pretty good, I think ^^)

Don't hesitate to trim the ends after you' re done. I had planned to do so, but I actually liked the 'raggedy' look of the braids (see picture above - these do look better in the 'flesh', I assure you).

And... that's all there is to it. Happy knotting!